Shaders Case Study: Pokémon Battle Transitions
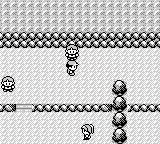
Remember the Pokémon games? I sure do! Just by looking at the gif above I can hear the sound a trainer makes when he spots you, and hear the battle chiptune beginning.
A while ago I watched a video that explained how to use shaders to recreate the battle transitions seen in Pokémon and other RPGs and I was hooked! I know next to nothing about game development but I knew I wanted to play with shaders and see what I could do.
Last time I wrote about WebGL I explained how to render a texture using regl, so I won’t go over that again. I’ll use the same vertex shader I used before to render textures and then apply different fragment shaders to achieve these transitions:
- Left To Right Wipe
- Curtain Fall
- Vertical Reflected Wipe
- Fade To White
- Fade To Black
- Spinning Pizza Slices
- That’s All Folks
All of them follow this strategy:
result = doMathWith(pixelCoordinates)
if result < cutoff
  paintBlack
else
  paintColorFromTexture(pixelCoordinates)
A value called cutoff determines how far along the animation is.
As the cutoff increases, so does the number of pixels that enter the first condition branch and so the more pixels are painted black. In the UI sliders you’ll see throughout this post the cutoff goes from 0 to 100 but this value is scaled down so that inside each shader it goes from 0 to 1.
All code blocks are editable. You can modify each example to see what happens. Give it a try!
Left To Right Wipe
void main() {
  if (uv.x < cutoff) {
    gl_FragColor = vec4(0, 0, 0, 1);
  } else {
    gl_FragColor = texture2D(texture, uv);
  }
}
Pretty simple. Each pixel’s x coordinate (which goes from 0 to 1) is compared with the cutoff. The more the cutoff increases the more black pixels appear.
This kind of wipe was used prominently in the Star Wars films.
Curtain Fall
void main() {
  if (uv.y < cutoff) {
    gl_FragColor = vec4(0, 0, 0, 1);
  } else {
    gl_FragColor = texture2D(texture, uv);
  }
}
Same thing as the previous shader but now each pixel’s y coordinate (which also goes from 0 to 1) is compared against the cutoff.
You can get a new transition by combining the conditions of the first 2 examples (uv.x < cutoff || uv.y < cutoff). And replacing || with && leads to another transition.
Vertical Reflected Wipe
void main() {
  if (abs(uv.y - 0.5) * 2.0 > (1.0 - cutoff)) {
    gl_FragColor = vec4(0, 0, 0, 1);
  } else {
    gl_FragColor = texture2D(texture, uv);
  }
}
A little more complicated now. First, the image is centered in clip space with the - 0.5. Then the image is multiplied by 2 so that it covers the entire screen. Then abs is used to get the absolute value of all coordinates. Whenever you see an abs call, think of folding a piece of paper in 4:
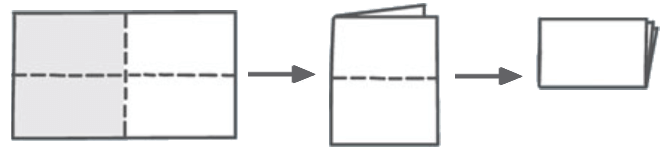
All quadrants of the image now go from 0 to 1 whereas in uv space they went from 0 to 0.5 and 0.5 to 1, vertically and horizontally.
Finally, each manipulated pixel’s y coordinate is compared with the cutoff. If the condition was y < cutoff the black area would expand from the middle of the screen. By changing the condition to y > 1 - cutoff, the black area expands from the top and the bottom.
Fade To White
vec4 white = vec4(1, 1, 1, 1);
void main() {
  vec4 color = texture2D(texture, uv);
  gl_FragColor = mix(color, white, cutoff);
}
This transition uses GLSL’s mix function which linearly interpolates between two values. This may sound complicated but in fact is just this:
mix(v1, v2, a) = v1 * (1 - a) + v2 * a
In this case, mix interpolates between the texture color and the white color. It progressively “mixes” the two colors as the cutoff increases, thus fading everything to white.
Fade To Black
void main() {
  vec4 color = texture2D(texture, uv);
  color.rgb = color.rgb * (1.0 - cutoff);
  gl_FragColor = color;
}
To fade everything to black, mix would also work:
vec4 black = vec4(0, 0, 0, 1);
vec4 color = texture2D(texture, uv);
gl_FragColor = mix(color, black, cutoff);
Notice, however, that in the mix equation the second parameter — v2 — would be equal to the color black, whose RBG values are all 0. Since multiplying by 0 is equal to 0 that part of the equation can be ignored. The code is thus simplified to multiplying the texture color by 1 - cutoff. However, multiplying the whole vector would include the alpha component, making the image transparent. To fix that, only the color components can be multiplied. This is very easy to do using a feature of GLSL called swizzling.
Spinning Pizza Slices
#define PI 3.1415926538

float getAngle(vec2 p){
  if (p.x > 0.0 || p.y != 0.0) {
    return 2.0 * atan(p.y / (length(p) + p.x));
  }
  return PI;
}

float quarterCircumference = 2.0 * PI * 1.0 / 4.0;
float rightAngle = radians(90.0);
void main() {
  float pAngle = mod(getAngle(uv - 0.5), rightAngle);
  float cutoffAngle = cutoff * quarterCircumference;
  if (pAngle < cutoffAngle) {
    gl_FragColor = vec4(0, 0, 0, 1);
  } else {
    gl_FragColor = texture2D(texture, uv);
  }
}
The concept for this transition was simple. Make the cutoff travel along a quarter circle. If the angle between a point and one of its quadrants’ axis is smaller than this cutoff, paint it black.
It got complex fast. How do I calculate the perimeter of a circle? Right, 2πr. Oh, but there’s no π constant in WebGL, I need to define it. How do I compute the angle between a point (x, y) and the positive x axis? atan. Oh, but I need it to be an angle between 0 and 2π. atan2. Oh, but there’s no atan2 in WebGL, I need to write it. And on and on.
In the end, for some reason the animation is going in a clockwise direction when it should be going in the opposite direction! I tried the same shader on a shadertoy and there it goes in an anticlockwise direction. I give up.
That’s All Folks
float maxRadius = sqrt(0.5 * 0.5 + 0.5 * 0.5);
void main() {
  float distanceMiddle = length(uv - 0.5);
  float radiusCutoff = (1.0 - cutoff) * maxRadius;
  if (distanceMiddle < radiusCutoff) {
    gl_FragColor = texture2D(texture, uv);
  } else {
    gl_FragColor = vec4(0, 0, 0, 1);
  }
}
Here each pixel’s distance to the center (or “radius”) is measured and compared against the cutoff. The cutoff travels from the maximum distance possible (one of the corners) to 0.
First, this maximum distance to the center is precomputed so that it is not repeated for every pixel. - 0.5 centers the image in clip space. length calculates the distance of each pixel to the center. Finally, that distance is compared with the cutoff.
By doing dist < (1.0 - cutoff) * maxRadius the black circle collapses into the middle. If the condition was dist > cutoff * maxRadius the black circle would expand from the middle of the screen.
OpenGL (and WebGL, and regl) are powerful technologies that make it possible to create very cool effects, with only a few lines of code!
Some things are still a bit too hard to achieve using only code though. The transition seen in the initial gif is one such example. That effect is much easier to implement using a gradient texture, which I explore in part 2.